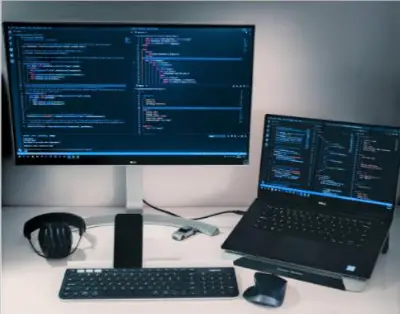
In today’s fast-paced tech world, the need for efficient multitasking has never been more crucial. Whether I’m gaming, creating content, or working on multiple tasks at once, a dual monitor setup can greatly enhance my productivity and overall user experience.
However, setting up dual monitors with both my GPU (Graphics Processing Unit) and motherboard might require some clarification for some people.
This article will discuss How To Dual Monitor With GPU And Motherboard. We will guide you through the setup and configuration process. We will begin by discussing why we chose dual monitors.
Why Do People Use Dual Monitors? Exploring the Purpose!

I love multitasking while playing my favorite video games with a dual monitor setup. It’s amazing how I can utilize the extra screen area as a desktop to browse the internet, watch videos, or display game walkthroughs and other helpful information.
Having two monitors really boosts my performance in so many ways. I can easily display two pages simultaneously and enjoy the additional screen space it provides. This setup has greatly improved my productivity across various tasks, including office work, graphic manipulation, and using learning apps. It’s like having a whole new level of efficiency right at my fingertip
- Lessen Downtime
- Boost Computer Efficiency
- Increase Productivity at Work
- Help You Stay Focused
An Overview Of Dual Monitors Setup – Started with Dual Monitor!

Setting up a dual monitor on my computer has never been easier. I only need a modern computer, an extra monitor, and the necessary display cable.
Nowadays, almost any PC or laptop can handle multiple display outputs. That means I can use my system to power a second Full HD monitor.
I have a variety of connector options available, including VGA, HDMI, and DVI. However, I need to confirm first that my motherboard or graphics card supports it to connect the displays without needing a connector or adapter.
If I decide to purchase a new monitor for my secondary display, I also have the option of DisplayPort connectivity. I have a few different options for arranging both monitors on my workstation.
If I have enough space on my desk, I can set up the displays using the standard monitor stands that come with them. Alternatively, I can opt for the latest monitor arm if my desk is small or I want more room.
These monitor arms can handle multiple large monitors while only occupying a small amount of desk space once the monitors are in place.
Now let’s move towards our basic question: how to dual monitor with GPU and motherboard?
How To Dual Monitor With GPU And Motherboard? 6 Easy Steps!
Any workspace with two monitors can benefit greatly, enhancing productivity and enabling more effective multitasking. We will provide comprehensive instructions on dual monitors with a graphics card and inbuilt graphics.
You will discover how to set up your motherboard for multiple screens, the kinds of ports and cables you require, and performance-enhancing advice.

Step 1: Connecting the Onboard Graphics Card:
The onboard graphics card on your computer must be connected before you can set up dual displays. Typically, you can do this by inserting the proper cable into the computer’s back, such as a VGA, DVI, or HDMI cable. Depending on how your computer is set up, you might also have to use an adapter to connect your display to the built-in graphics card.
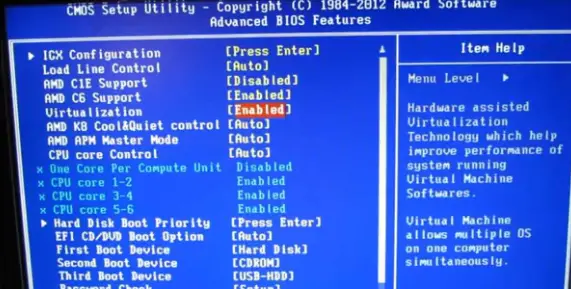
Step 2: Changing BIOS Settings:
You must set up your BIOS to support twin monitors once you have connected your onboard graphics card. The BIOS settings on your computer can be accessed by pressing a particular key (such as F2 or Del) when the computer is booting up. You must locate the “Integrated Peripherals” or “Onboard Devices” section of the BIOS settings and turn on the onboard graphics card.
Step 3: Driver Installation:
After tweaking your BIOS settings, you must install the correct drivers for your onboard graphics card. The usual method is to obtain the necessary drivers from the manufacturer’s website and install them on your computer. Make sure you choose the appropriate drivers for your onboard graphics card.
Step 4: Choosing monitor layout:
After installing the drivers and configuring your onboard graphics card, you must choose the monitor arrangement for your multiple monitors. The usual method is to right-click on your desktop and choose “Display Settings” or “Screen Resolution.” You may then decide to “Extend” your desktop over multiple monitors or “Duplicate” your desktop on both monitors from the menu that appears.
Step 5: Tuning the Display:
You must configure each monitor’s display settings after choosing your monitor layout. This is typically accomplished by selecting each monitor’s appropriate resolution and refresh rate from the “Display Settings” or “Screen Resolution” menu. Each monitor’s orientation and placement can be changed to best suit your requirements.
Step 6: Maximize Your Workflow in Step:
After setting up and configuring your multiple displays, you are now prepared to maximize your workflow. Now that you can readily access many windows and programs simultaneously, you can work more productively and efficiently. Dual monitors can make it much simpler to complete tasks, whether you’re a designer, programmer, or multitasker.
However, you must take the steps listed below to complete the setup.
How do you set up the primary and secondary Monitors? 8 easy steps
When setting up dual monitors, I usually pick one of the two screens to be my primary monitor. I tend to choose the monitor that’s larger or has better resolution, color, and refresh rate specifications.
It’s entirely up to me which of the two identical monitors I want to designate as my primary display. Follow the instructions below to set up your primary and secondary monitors:
- When I first plug in the second monitor, it automatically sets to “Duplicate” settings.
- To set up multiple displays for the best dual monitor experience, I press “Win key + P” and choose to expand.
- Then, I need to visit the display settings.
- I right-click the desktop and select “Display Settings” from the menu that appears.
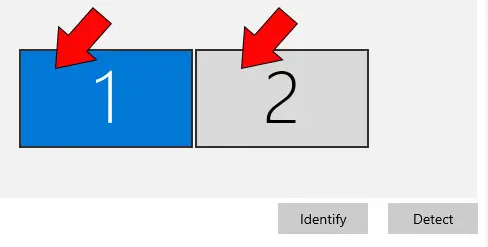
- Here, I can see both of my display options.
- Windows usually selects one of the screens as the default option (1).
- I click the “Identify” button to make sure the correct display is chosen.
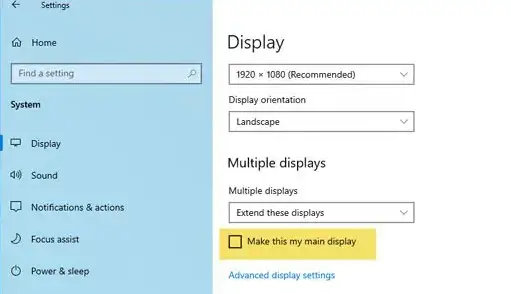
- If I want to change my primary display, I select the new one and tick the “Make this my main display” box.
How To Set Up the Monitor Resolution? Don’t Skip the 5th step.
When I’m setting up multiple displays, the resolution of each monitor is the next thing I need to consider. I won’t encounter any issues if both monitors have the same size and resolution.
But, if one of my displays has a higher resolution than the other, I’ll need to adjust the resolutions in the display settings tab manually.
To ensure the best image quality on both screens, whether it’s my primary or secondary option, I’ll need to adjust the resolution through the display settings options. Here’s how I can do it:
- When I need to adjust the resolution of one of my monitors, I simply click on it within the “Display Settings” tab. If can’t find it there, I just scroll down to the “Display Resolution” section and pick the monitor I want to adjust.
- Here, I can see all the resolution options that my graphics processor can handle.
- Typically, the “Recommended” option is the highest resolution I should go for based on my monitor’s capabilities.
- If I want to set a custom resolution, I can do that through the settings of my specific graphics driver.
- After selecting the monitor from the top menu, I tweak the display resolution to match what I need for my secondary monitor.
- If one of my monitors has a higher resolution than the others, I make sure to select the appropriate “Scale and layout” option for that monitor. This ensures that I can maintain a consistent viewing experience across all my monitors.
How To Set Up The Monitor Display Style?
After setting up your twin monitors and customizing the resolution settings, you can now begin using your monitors for your usual work.
A window is simple to move from one monitor to another and resize for that particular monitor by dragging and sliding on the window.
You can access the Windows 10 display style menu by pressing “Windows + P” afterward. Here, you can customize the numerous display styles to suit your tastes.
If your secondary display is not necessary, you can choose this option. PC screen only. By doing this, you can turn off your secondary display and restore the active windows of your primary display.
While viewing movies or playing video games is a fantastic power-saving alternative. In these settings, there are 3 options, which are as follows.
- Duplicate: When you choose the duplicate option, the primary display is replicated on your secondary monitor. By selecting this option, your secondary screen will display everything on your primary screen.
- Extend: The extended option is the most widely used multiple display type. This option expands the display to your secondary monitor, allowing you to use both monitors simultaneously for a more comprehensive workspace.
- Second screen only: You can choose this option if all you want to do is check your emails or carry out a similar operation. As the name implies, it will turn off your primary screen and display all material solely on your secondary screen.
How To Set Up The Monitor Position? 5 Easy Steps
The monitor position is yet another aspect that changes according to factors like the monitor size and resolution. Even after setting up both monitors to the highest possible resolution, you will find a slight imbalance between the screens if the resolution differs. Also, if you use a horizontal and vertical monitor pair, you must adjust the monitor position accordingly.
Follow these instructions to adjust the monitor position.
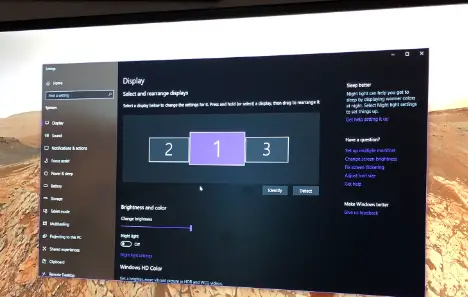
- Head over to the “Display settings” tab again.
- Here, you will see the “Rearrange your displays’ option, where the monitors are placed in a particular fashion.
- You can click and drag the primary and secondary monitor until you find the desired position for your setup.
- Once set up, click apply to check for a seamless transition between monitors.
- If you use a horizontal and vertical setup, click on your secondary monitor and select the “Display orientation” option from the list. In this case, depending on where you are, you can choose either “Portrait” or “Portrait (flipped)”.
Verify if your BIOS is compatible with multiple monitors:
Check your motherboard’s BIOS for the multi-GPU option, especially when connecting your monitor to the GPU, whether you can use several monitors.
Because in some circumstances, the BIOS will automatically disable your motherboard’s video ports if you install a dedicated GPU and enable the monitor that is attached to the GPU.
Verify that “Multi-GP Support” is turned on in the BIOS’s primary settings. In specific BIOS, it is named “iGPU.” Your motherboard supports multiple displays if “iGPU – Enabled” is present.
How can I enable two monitors in my Gigabyte BIOS? 4th Step is Important!
Gigabyte motherboards include many options that allow consumers to customize their machines. The opportunity to enable two monitors in the Gigabyte BIOS is one of the most well-liked features. Thanks to this functionality, users can use two displays simultaneously, which gives them more control over their computer environment. You must enter the BIOS settings on your computer to enable dual displays in the Gigabyte BIOS.
- The first step is to restart your computer and launch the BIOS setup by pressing the proper key (often F2 or Del) while the computer is booting. Go to the “Integrated Peripherals” or “Onboard Devices” section of the BIOS setup and then search for the option to turn on the onboard graphics card.
- You must look for the “Integrated Graphics Configuration” or “Integrated Graphics” section. The onboard graphics should have an “Enable” or “Disable” option here. Make sure that it is “Enabled.”
- The “Multi-Monitor” or “Dual Display” section is then accessible.
- Afterward, You can go to the “Multi-Monitor” or “Dual Display” section. Select the “Auto” option for the monitor detection after ensuring this option is enabled. As a result, the BIOS will be able to recognize and set up the dual displays automatically.
- Finally, you must quit the BIOS setup after saving your modifications. The twin monitors should be instantly detected and set up when your computer restarts. Now that your desktop has been extended across both monitors, you should be able to multitask more efficiently and have more screen space.
It’s important to note that depending on the version of BIOS you are running, the precise placement and phrasing of the options may change, but the fundamental procedure should remain the same. If you need help locating the options, refer to the motherboard’s manual or look up your model’s instructions on the Gigabyte support page.
Troubleshooting Typical Dual Monitor Problems
Try these troubleshooting techniques if the dual monitor setup isn’t working correctly:
- Verify the cable connections to ensure the GPU, motherboard, and displays are all connected to the video cables firmly. If necessary, try using alternate cables to rule out any problems with the wires themselves.
- A dual monitor arrangement may experience problems if the graphics driver is outdated or incompatible. For the most recent onboard graphics driver, go to the website of the GPU maker.
- Make necessary BIOS settings changes. For example, some motherboards may require users to enable integrated graphics in the BIOS. To access and modify the BIOS settings, go to the motherboard’s user manual.
Additional Tips for Multiple Display Configuration:
Here are some more settings you may use with your various display settings to simplify the controls. These choices give you quick shortcuts to complete tasks more quickly and a good viewing experience across different monitors.
- Personalize your taskbar: When setting up multiple monitors, you will see the identical taskbar on both displays. You can decide whether or not you want a dual taskbar, while it does make it simpler to access the toolbar. To modify this setting, navigate to the desktop’s “personalize” option and select “Taskbar” from the menu on the left. You can select “Show taskbar on all displays” from this menu.
- Choose appropriate wallpaper: If you want to use more than one display, look for wallpapers with a higher resolution covering both screens while preserving fine image quality. If you would like to use the same wallpaper for both screens in its entirety and you have Full HD monitors, you must apply an Ultra HD wallpaper.
- Useful keyboard shortcuts: While working, a few shortcuts will make it simple to move between your windows on both monitors.
- Win Key + Arrow Keys: You can drag the currently open window toward the pressed arrow key using these two keys together. In this manner, controlling the windows on a specific monitor is easy.
- Shift + Win Key + Arrow Keys: This combination is very similar to the one previously discussed. Adding a shift to the combination instantly moves the window to the next monitor instead of moving it manually.
- Win Key + Home Key: Pressing this combination will minimize all other windows on your desktop except the active window.
- Third-party software: You can further personalize your multiple monitor configuration with third-party apps. Software like “Wallpaper Engine” already includes a unique option for dual monitors, which makes it easier to choose the suitable wallpaper for both displays.
Wrapping Up:
Finally, setting up multiple monitors with my GPU and motherboard can really take my computer experience to the next level, both for work and play. By following the instructions provided in this article, I’ll be on my way to enjoying all the benefits of a dual monitor setup. I can look forward to enhanced productivity, a more immersive gaming experience, and improved multitasking capabilities with twin monitors. It’s exciting to think about how this setup will elevate my overall computer experience.
FAQs:
Q1. Can you use a twin monitor with a motherboard and GPU?
Everything is fine. You can use your separate GPU in addition to your on-board graphics adapter because operating systems like Windows support running several graphics adapters simultaneously.
Q2. Should I attach my second monitor to the motherboard or the GPU?
Connect it to the GPU if possible because doing so would result in better graphics, but if that isn’t the case, you can also link it to the motherboard.
Q3: Can I use my GPU simultaneously with HDMI and DisplayPort?
In general, yes; however, you must check your GPU’s manual or specifications to determine whether simultaneous HDMI and DisplayPort output is supported (typically, it is). In some unique circumstances, you may need to disable CrossFireX in the driver’s options.
Q4. Can you use one GPU to drive two monitors?
If the graphics card has at least two outputs compatible with your displays, you can use a single graphics card to power two monitors. Most contemporary graphics cards come with two or more outputs, including HDMI, DisplayPort, and DVI.
Q5. Does the GPU work harder while using two monitors?
Yes, having two screens attached to your PC will make your graphics card work harder. Dual monitors may have little impact on your GPU’s lifespan.
Read Also:
- What Motherboards Are Compatible With Ryzen 7 5800x? | 8 Best Motherboard For Ryzen 2023
- Can A Motherboard Bottleneck the GPU? Reasons & Fixes 2023
- What Is Orange Light On Motherboard And How To Fix Issue?
- Is Buying A Used Motherboard Safe? Unveiling the Truth 2023
- What Motherboard Drivers Do I Need? – A Comprehensive Guide 2023
References:
- https://forums.tomshardware.com/threads/how-to-set-up-dual-monitors-one-in-gpu-one-in-motherboard.1958466/
- https://www.quora.com/Is-it-possible-to-connect-PC-monitors-to-both-the-GPU-and-the-motherboards-HDMI-and-run-them-all-at-once
- https://www.asus.com/us/support/faq/1045574/
- https://www.reddit.com/r/pcmasterrace/comments/uy6e87/how_bad_is_it_to_plug_2nd_monitor_into_the/
- https://superuser.com/questions/1076722/2-monitors-one-rendered-by-cpu-and-another-by-gpu