Motherboard standoffs are essential for ensuring your computer runs efficiently and is protected from accidental short circuits. This article is meant to give you a thorough awareness of what motherboard standoffs are, why they matter, how to install them, and much more, whether you’re a tech enthusiast building a custom PC or simply curious about computer hardware.
Let me briefly explain motherboard screws. The motherboard tray in your computer case is elevated by metal pillars known as motherboard standoffs. Let us begin with a detailed explanation of the motherboard standoff.
What Are Motherboard Standoffs?
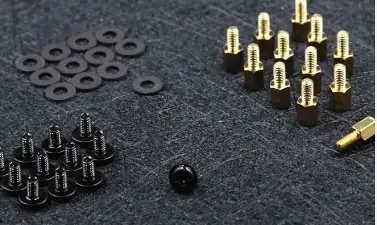
Standoffs are tiny metal objects that resemble screws. On the other hand, a standoff contains an anchor where another screw can be placed in place of a head. Traditionally, standoffs are screwed into a casing. The motherboard is then set on top of the standoffs and fastened to them using screws.
Metal risers called motherboard standoffs to keep your motherboard elevated from the motherboard tray in your computer case. Because an electric discharge could short the circuits on your motherboard and possibly your RAM or CPU if your motherboard touches your casing, standoffs are essential to protect the parts inside.
Metal or nylon spacers, called motherboard screws, separate the motherboard from the tray in a computer enclosure. It is necessary to use standoffs to keep a motherboard stable and elevated above the case’s motherboard tray.
Circuit boards with an electric current running through them are called motherboards. This electricity might leak into the case if it contacts the motherboard tray, shorting the motherboard or other parts.
To leave room between the motherboard and the computer case, standoffs are lifted to prevent this. Once you screw them in, they also help to secure your motherboard.
Standoffs must fit into sure holes on your motherboard, which are made to be secure points of contact. Standoffs fit into holes in your motherboard when they are seated. The motherboard is installed by inserting screws from above into the mounting holes of the standoffs.
For static buildup on the motherboard to properly discharge through the standoffs, into the casing, and down to earth via the power supply, standoffs frequently serve as grounding points.
Are Motherboard Standoffs Included?
No! Not at all. It’s a widespread misperception because standoffs are part of (or built into) the computer chassis. Although cases can differ greatly”
- Size
- Shape
- Depth from one another and motherboards are standardized within form factors.
- For compatibility, screws, and standoffs are provided.
But when it comes to screws and standoffs, modern computing has a lot of standardization. You may use the standoffs from an ATX case, for instance, with any ATX board in any ATX case.
Which Screws Are For Motherboard?
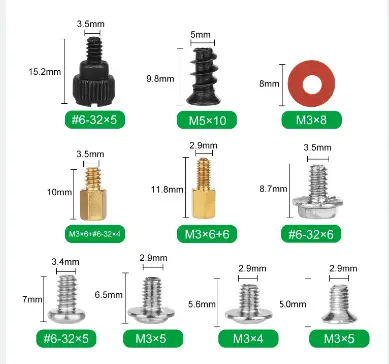
A #6-32 UNC standoff is frequently used on motherboards and other circuit boards. Commonly found on the ends of DVI, VGA, serial, and parallel connectors are #4-40 UNC thumb screws. Modern cases from some manufacturers (Dell, Gateway) and enthusiast cases use a toolless design rather than any screws.
Motherboard standoffs have a wide variety of styles, including:
- Plastic
- Metal
- Various colors
- Various lengths, etc
Therefore, you might find a wide range of motherboard standoffs. However, most motherboard standoffs are typically 1 cm long and constructed of brass. That being said, they are still standardized. Most consumer motherboard screws use the ISO M3 or UTS standard #6-32 UNC.
Therefore, regardless of color, length, or material type, your standoffs may accept standard #6-32 UNC or M3 screw and screw into any PC case.
Reminder🛑: M3 and #6-32 UNC are comparable but incompatible! They are not interchangeable. For instance, a #6-32 UNC standoff cannot accept an M3 screw.
Is It Necessary To Use Motherboard Screws? 🤷
Motherboard standoffs are essential to secure your motherboard and maintain electrical safety for your system. If there are any points of contact between the PC case and the motherboard, you risk shorting, damaging, or even bricking your motherboard or other components if you don’t utilize standoffs.
Your motherboard won’t bend or droop if the required amount of standoffs are used, and they must be securely affixed to keep it and the related components stable inside the PC case.
What Happens If You Don’t Use Motherboard Screws? ⚡
Motherboard screws are necessary to protect your motherboard and preserve the electrical safety of your system.
If there are any points of contact between the PC case and the motherboard, you risk shorting, damaging, or even bricking your motherboard or other components if you don’t utilize standoffs.
Without standoffs, one of these consequences is all but certain, whether you fry your motherboard, CPU, or both or fail to boot. Said installing a motherboard without standoffs will make you unhappy.
Installing every screw and standoff your motherboard supports is an excellent practice because doing so wholly ensures you’ll never have the chance of something going wrong.
What Should You Do If the Motherboard Standoff Screws Won’t Turn? 🙇
Motherboard standoffs support a specific kind of screw, either an M3 screw or a #6-32 UNC type screw.
Look at your case’s manual’s parts list or package contents page. You’ll most likely discover a diagram showing what kind of screw you need and where to obtain it.
Never, ever try to push a screw in! If it fits, it’s likely only meant to be used with the motherboard standoffs. The board must be bent, warped, or improperly seated if one cannot reach it. Make sure it isn’t resting on a cable or anything else.
What If I Already Have Connected Standoffs? 💥
It’s there so you can use it as a guide to ensure your motherboard is centered with the case’s other standoffs.
Mobile and integrated standoffs are already present in modern PC cases and cabins. The user is not required to install any additional standoffs in such circumstances. These built-in standoffs are well-designed and placed following safe recommendations.
Read Also: do motherboards come with SATA cables?
How Do I Install Motherboard Standoffs? 4 Easy Steps!
Installing motherboard standoffs is simple, but doing it well is essential to the stability and security of your system.
- Verify the form factor of your motherboard:
Your motherboard’s form factor, often Micro-ATX, Mini-ITX, or ATX, should be verified before action.
Where you attach the standoffs in your case will be determined by the form factor of your motherboard. These are standard, which is good. Therefore, standoff solutions will be accessible for the most widely used PC case sizes and all common motherboard form factors.
Typically, the standoff locations on the motherboard tray of your case are marked with a letter to indicate the form factor, such as ‘M’ for Mini-ITX. You should be able to find installation instructions for standoffs for various motherboard form factors in your case’s documentation.
2. Install the Standoffs.
Clear away any wires to make room for the motherboard if you’re still unsure of the standoff locations to use. Place the motherboard above the case’s tray to check the location of the standoff holes.
To determine where to install the standoffs, compare the standoff holes on the motherboard to possible standoff locations on the motherboard tray.
Use your fingers to screw the standoffs into the motherboard tray’s corresponding standoff holes.
3. Install your motherboard
You can mount your motherboard onto the standoffs after they have been appropriately fastened into your motherboard tray.
Check for any obstructions first, moving all cables away from the motherboard tray. An alignment pin on the motherboard tray should provide a center standoff for your motherboard’s central standoff hole. After that, place your motherboard in line with this pin.
Gently drop the motherboard onto this pin, making the other standoff holes align with your fitted standoffs. Once installed on all standoffs, give the motherboard a light shake to ensure it is firmly in place.
Keep reading: The Motherboard Light Is On , But No Power Up (Fixed) 2023
4. Screw Down the Motherboard:
Using a screwdriver, tighten the provided 6-32 UNC or M3 standoff screws into the standoffs once the motherboard has been installed on them to ensure stability.
Ensure the screw heads are flush with the motherboard and tight enough to prevent the motherboard from shifting but avoid overtightening them to avoid damaging the motherboard.
How Do You Remove Motherboard Standoffs?

If the metal is warped from heat and time or the standoffs are overtightened, the motherboard standoffs may be held tightly to the casing.
If so, releasing the standoff is as simple as grabbing a pair of needle-nose pliers—or any other pair of pliers with an appropriate size—and doing so. At that time, you can unscrew it with your hand.
Is It Possible To Maintain Clear Space Under The Motherboard?
The motherboard has some room below it where you could be tempted to route your cables since it is mounted and raised on standoffs.
However, the space beneath should be left empty to avoid damage to the motherboard and promote adequate airflow.
What Number of Motherboard Standoffs Are Required?
The number is necessary to attach your motherboard to your casing. A few missing standoffs needing to be included aren’t a big concern as long as the motherboard is safe and stable.
Wrapping Up:
Finally, motherboard standoffs are metal risers that lift your motherboard from your PC case’s motherboard tray. Because an electric discharge could short the circuits on your motherboard and even your RAM or CPU if your motherboard contacts your case, standoffs are necessary to protect your components. After installing the standoffs, place your motherboard on top of them and insert the standoff screws into the corresponding holes, tightening them firmly but not excessively.
Read Also: What To Do If The Motherboard Doesn’t Have WiFi? 🛜(Answered) 2023
FAQs:
Q1. Why are the motherboard standoffs necessary?
Motherboard standoffs are typically steel spacers between the motherboard and computer case to prevent contact between a motherboard’s circuitry and the casing.
Q2: What happens if a motherboard is installed without standoffs?
Depending on how the case is built. You run the danger of shorting out and possibly ruining the board if it’s made of metal. I would reinstall the case using the standoffs if the case is made of metal. There is little to worry about if it is non-conductive (or at least not highly conductive like metal), like plastic.
Q3. Do the motherboard standoffs ground the motherboard?
All of the ground wires between the power supply and the motherboard connect to the motherboard, which is grounded. There is some contact between the standoffs, but it is not crucial.
Q4. How many standoffs are required for an ATX motherboard?
A computer case typically comes with 9 standoffs to fulfil ATX specifications unless the case is more minor. The majority of ATX motherboards will use six smaller boards or even fewer. All nine will be used by more expensive “wider” ATX boards, which is convenient when they are close to the primary I/O for the disk drives.
Q5. Are standoffs required in every PC case?
No! No, they don’t. Contrary to popular belief, standoffs are really part of (or integrated into) the computer case itself. Although issues can differ significantly in size, shape, and depth, motherboards are standardized within form factors, and screws and standoffs are included to ensure compatibility.
Read Also:
- How Much It Cost To Replace Motherboard On Laptop? A Pro Guide 2023
- What Is JFP1 On Motherboard? A Complete Guide
- How To Remove Motherboard Standoffs? Removing Standoffs Like a Pro
- How To Dual Monitor With GPU And Motherboard? A Detail Guide 2023
- What Motherboards Are Compatible With Ryzen 7 5800x? | 8 Best Motherboard For Ryzen 2023