Have you ever noticed that red light blinking on your computer’s motherboard? If you have, you’re in the right place. That red light is like a little signal telling us that something didn’t quite go as planned when the computer fired up all its hardware.
This article will explain What Does Red Light on a Motherboard means, the secrets behind the red light on your motherboard, including its causes, solutions, and much more. So, let’s get started and spread some light on this fascinating subject!
Let’s start with our basic question: what does red light on motherboard mean?
What Does Red Light On Motherboard Mean?– Unveiling The Secrets Of Urgent Messages
When I see that red light glaring on my motherboard, it’s like my computer is trying to send me an urgent message. You know what that means, right? Something’s up with the internal hardware – either it’s not plugged in right, or it’s decided to take a coffee break without letting me know.
I’m talking about stuff like the CPU, RAM, or that graphics card I rely on for smooth visuals. And here’s the kicker – sometimes it’s the CMOS battery playing tricks on me. Boot errors on the hard drive where my precious OS lives? Yeah, that can trigger the red light spectacle, too.
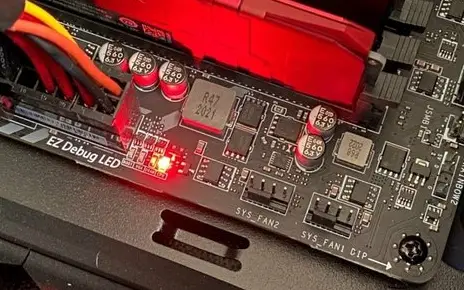
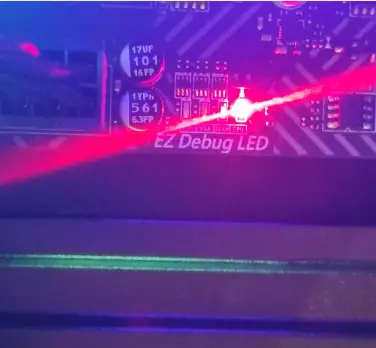
Those red LEDs on the motherboard? They’re like little detectives, revealing the drama during the hardware’s grand entrance – the POST, or Power-on-self-test. When I press the power button, the computer puts on a show to ensure everything’s in order.
These LEDs, the Debug LEDs, are my troubleshooting sidekicks. When my monitor decides to be silent about the issue, these lights step up. If one of them decides to camp out and stay lit, that’s my cue that something’s gone haywire. It could be anything from a component throwing a tantrum and needing replacement to a connection feeling meh or gear not vibing well together. My computer says, “Hey, we need to talk – something’s wrong.
Read Also: What Is Orange Light On Motherboard And How To Fix Issue?
First, we will discover the root causes of the red light on the motherboard.
Cracking the Code: 9 Simple Reasons Behind My Motherboard’s Red Light”
Ever wonder why that red light on your motherboard is causing a fuss? Let me break it down for you – plain and simple.
- Loose Power Connection: If your power supply cable is acting up, it could be the culprit. Check for a wonky cable or loose connections. Fix it by securing the cable or swapping it out.
- GPU or CPU Not Behaving: Sometimes, the graphics card or processor can misbehave and trigger the red light. Make sure they’re snug where they belong. If not, a little readjustment might do the trick.
- Dead CMOS Battery: Your trusty CMOS battery might be on its last legs. Swap it out for a new one, and that red light will likely disappear.
- RAM Troubles: If your RAM is out of place or acting up, it can lead to a red light. Check and re-seat it properly. If it’s beyond repair, consider getting a new one.
- BIOS Acting Up: The BIOS can be a bit finicky. If it’s causing trouble, a proper reset is like hitting the motherboard’s reset button.
- Defective Motherboard: If the motherboard itself is faulty, it’s time for a change. Swap it for a new one and say goodbye to the red light drama.
- Hardware Gone Bad: When your hardware starts acting weird, a red light may follow. Identify the troublemaker and either fix or replace it – problem solved.
- CPU Overheating: Long hours of computer use can heat your CPU, triggering the red light. Cool things down by improving ventilation – like a breath of fresh air.
- Hard Drive Issues: A problematic hard disk can be the root cause. Swap it out for a new one; your motherboard might thank you.
You can tackle that red light issue without sweat with these simple solutions. Let the troubleshooting begin!
Read Also: What Does Yellow Light Mean On Motherboard?- Fixing Guide
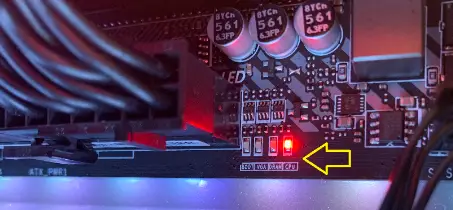
What LED Indicators Mean? Top 4 LED Indicators
These days, most motherboards feature four LED indicators, all of which have the same function: to identify problems that arise during the POST (Power-on-self-test) phase. Before anything may be seen on your monitor, often. The majority of motherboard diagnostic LEDs are made up of 4 distinct LEDs:
- BIOS
- CPU
- VGA
- DRAM
1. CPU:
Any CPU-related problems, such as incompatibility difficulties, out-of-date BIOS firmware, and others, will be indicated by this diode.
- Verify the QVL (Qualified Vendor List) on your motherboard to verify that the CPU you’re using is compatible.
- If your CPU was produced later than your motherboard, you might need to upgrade your BIOS. Here’s how to use your BIOS without a CPU, even if your present CPU is incompatible.
- If your processor and the required power connectors from the PSU (4-pin and 8-pin!) are connected correctly, your CPU may also cause this diode to blink.
- If not, remove the CPU cooler, remove the CPU from the socket, and inspect it for bent pins (if any) or thermal paste residing in unexpected locations.
- Replace the heatsink and reinstall the CPU.
- If this has no effect, the CPU is either broken or has reached the end of its useful life and needs to be replaced.
2. DRAM:
If the DRAM LED begins to blink throughout the boot-up process, something is amiss with your RAM modules.
- If your system contains more than one stick of RAM, be sure they are of the same manufacturer and frequency; mixing RAM modules can cause many problems.
- Next, confirm that your RAM sticks are correctly seated and that both clamps flanking them are securely fastened.
- If the problem persists, try booting your system with only one RAM module. Try each of your RAM modules one at a time to see if they are damaged. Ensure it’s in the right slot (typically the second one from the CPU).
- Curiously, bent CPU pins can also cause the DRAM LED to illuminate, so double-check both CPU and motherboard pins for damage.
- Finally, ensure that the RAM Modules you’re using are on your Motherboard’s QVL (Qualified Vendor List); if not, the RAM modules may be incompatible with your motherboard.
Read Also: Why Is There A White Light On My Motherboard? – A Detail Guide 2023
3. BOOT:
The BOOT LED lights indicate the status of your primary storage device, which is where your operating system is installed. If this diode begins to flicker, your HDD/SSD is the culprit.

- If you’ve just assembled your PC, this diode may blink because no operating system has yet been installed.
- If not, check that the boot drive is correctly attached and designated as the primary boot drive in your BIOS.
- If your BIOS does not identify your SSD, follow our guide here.
- If the system still does not boot, unplug all storage drives except the boot disk and try again.
- Your boot drive may be corrupted or utterly dead if the problem continues. If it’s corrupted, you can try reinstalling your preferred operating system; otherwise, you’ll have to replace it entirely and start again.
- For SATA HDDs/SSDs, ensure that both the Data and Power Cables are connected and that your SATA Port isn’t disabled due to bandwidth sharing (try a different SATA port).
- For M.2 SSDs, make sure your motherboard supports the type of M.2 drive and interface protocol you’re trying to use (e.g., NVMe isn’t supported by all M.2 slots, chipsets, and motherboards). Examine the spec sheet and manual for your motherboard.
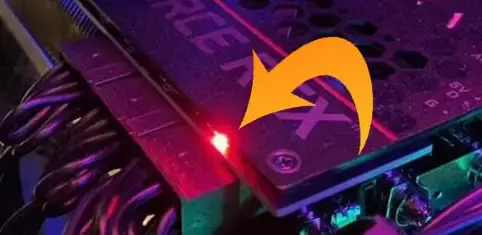
4. VGA:
Whenever there is a GPU issue, the VGA LED will begin to blink. This can happen if your graphics card isn’t correctly connected (including the power lines from the PSU) or the GPU is physically damaged.
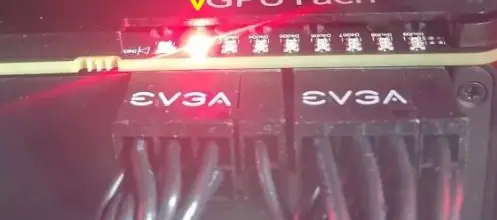
- Confirm that all 6-pin and 8-pin PCIe power lines are firmly attached to the GPU and the PSU.
- Ensure your GPU is in the correct slot (PCIe x16). If you don’t have an ITX motherboard, you might try installing your GPU in a new PCIe slot in case the x16 one is broken. Examine the slot and the GPU for any physical damage.
- When installing the GPU, ensure the PCIe socket’s back latch has snapped.
- If nothing else appears to be working, you can use your CPU’s iGPU (if it has an integrated graphics processor). Otherwise, your graphics card will need to be replaced.
- If feasible, test your GPU on a friend’s computer to see if it works. Alternatively, try a different GPU on your PC to see if that resolves the issue. You can then narrow down the suspect.
- Check that your monitor is plugged into the Graphics Card (if you have a discrete GPU) or the display port on your motherboard (if you have an iGPU).
Cracking the Code: More Reasons Behind the Red Light on My Motherboard
When that red light on my motherboard starts acting up, my computer tries to tell me a secret code. Turns out, there are a few more reasons behind this mysterious glow. Let me spill the beans.
1. The Sneaky Culprit: Poor PSU
You wouldn’t believe it, but a faulty power supply could be the troublemaker. To play detective, I put my power supply to the test by connecting it to another system. If it’s a modular PSU, I swap out any wires. And, if I’ve got a spare, that might do the trick.
2. Overclocking Woes: Unstable and Flashy LEDs
Sometimes, my PC shows off its flashy LEDs, especially the CPU LED, thanks to unstable overclocking. The solution? A little BIOS restart to clear out all those overclocking settings and let the PC boot up as usual. Once it’s up and running, I play it safe by lowering the overclock numbers and running stress tests to ensure everything’s stable.
3. The Uncommon Culprit: CMOS Battery Depletion
It is not as standard, but a drained CMOS battery can be the culprit. Instead of adjusting my BIOS settings every time the power takes a nap, I’ve learned that replacing the battery is better. Most motherboards sport a budget-friendly CR2032 CMOS battery, making the replacement a breeze. Just follow these steps:
- Turn off your computer and unhook any power wires.
- Disconnect your power supply.
- If you have an ATX or mATX motherboard, press/push the safety lock/clip, remove the CMOS battery, and pop in the new one until you hear that satisfying click.
- For most ITX motherboards, find the CMOS battery covered in plastic or tape. Disconnect the plug, repeat the steps, and voilà!
Now that I’ve unraveled these additional mysteries let’s dive into the solutions and tackle that red light head-on. Time to decode this motherboard secret!
Reviving My Motherboard: Steps to Fix the Annoying Red Light”
So, that pesky red light on my motherboard won’t give up, and I’m not about to let it win. Let’s dive into some solutions, shall we?
1. Clearing the Deck: Uninstall Hardware
Time to give my motherboard some breathing space. I start by disconnecting all the gears and connections. A quick wipe-down with a dry cloth to get rid of any dust – because, you know, dust loves to party in machinery. Then, I inspect each piece of hardware, clean them up, and closely examine connectors. We’re aiming for a clean slate for a bit of cleaning here a nudge there with a screwdriver if needed.
2. The Ultimate Detox: Unplug Everything
This is the grand finale. I unplug every external connection and peripheral device. No keyboards, no mice, no speakers – they’re all on timeout. Power and display cables get a free pass, though. Time to hit the power button. Did the system start? If yes, I start reconnecting things individually to pinpoint the troublemaker.
3. Storage Checkup: Peer Review Needed
I might need a buddy for this one. Swapping out the storage device to give the booting process another go. If there’s an issue with the main system, anything could be the culprit, even the storage. Borrow a buddy’s storage device, slap it in, and see if the computer cooperates.
4. BIOS Yoga: Resetting the Brain
Now, let’s mess with the BIOS, the brain of the operation. A quick reset does wonders. It’s as simple as popping out the CMOS battery, waiting for five minutes, and plugging it back in. If I’m feeling adventurous, there’s the CMOS jumper trick – move it to the other two pins for five minutes, then back to the original setup. Time to hit that power button again and see if the red light is ready to call it quits.
5. CMOS Makeover: Changing the Power Source
What if the red light is still playing hard to get? It might be time to consider a new CMOS battery. Especially if my computer is a bit vintage and this red light business is a first-time occurrence. Swapping out the CMOS battery for a fresh one could be the game-changer. Just one rule – don’t spend the dough unless you’re sure this is the troublemaker.
With these steps, I’m trying to kick that red light to the curb and return my motherboard to its happy, glowing self. Let’s do this!
Conclusion:
When I see that red light on my motherboard, I know it’s sending me a warning I shouldn’t overlook. It hints at different hardware issues, like problems with my RAM, CPU, or graphics card. So, what I need to do is take a systematic approach to troubleshooting. I’ll check connections, test components, update my BIOS or firmware, and ensure there’s no overheating. I can bring my computer back on track with the necessary procedures by going through these steps.
FAQs
Q1. Is the red light on the motherboard safe?
A red light on your motherboard indicates a problem with one or more of your computer’s hardware components. This could be an issue with the power supply, CPU, RAM, hard drive, or any other system component.
Q2. Is a red light on the motherboard usually indicating a significant problem?
A red light on your motherboard indicates that internal hardware is either incorrectly plugged in or is not working.
Q3. Do the motherboard lights stay on after the computer is turned off?
Yes, the motherboard lighting will remain on until the PC is turned off at the socket or PSU switch.
Read Also:
- What Can I Hook Up To The Motherboard RGB Header? Unlocking The Magic
- What Are Motherboard Standoffs?- A Pro Guide 2023
- How Much It Cost To Replace Motherboard On Laptop? A Pro Guide 2023
- What Is JFP1 On Motherboard? A Complete Guide
- How To Remove Motherboard Standoffs? Removing Standoffs Like a Pro